In the ever-evolving landscape of smart homes, Home Assistant stands as a beacon of customization and control. As enthusiasts, we invest time and effort into perfecting our setups, fine-tuning automation, and creating an environment that seamlessly aligns with our lifestyles. Yet, amid the excitement of building the ultimate smart home, the importance of data backup often takes a backseat.
Imagine a scenario where your meticulously crafted Home Assistant configuration is at risk – be it due to hardware failure, accidental deletions, or unforeseen mishaps. How do you ensure that your smart home’s brain, packed with add-ons, automation, scripts, and essential configurations, remains intact and recoverable?
If Home Assistant is hosted as a virtual machine, the answer is simple: just about any backup software will work. Of course, being me, that would usually mean Veeam. But what happens in cases like mine, where your installation is bare metal on a Raspberry Pi 4? Unfortunately, Veeam doesn’t officially support or maintain a Veeam Agent for Raspbian/ARM. Enter a useful addon someone has developed for Home Assistant that utilizes rclone, and Veeam’s new 12.1 release of Backup & Replication, which adds the capability to protect object storage buckets.
Pre-Requisites
- Home Assistant running with HACS added
- Veeam Backup & Replication version 12.1 or later installed
- A license for VBR
- To protect S3 buckets with VBR, you must have a Standard or higher license. Community Edition does not support the capability.
- Many IT professionals with certifications or blogs are eligible for a free Veeam NFR key. You can apply for it here to gain this feature.
Getting Started
In order to write backups to S3 and manage the automatic pruning of old backups, we will be installing and configuring two add-ons developed by jcwillox: Auto Backup and HASSIO Rclone Backup.
First, we will want to add some HACS repositories for the add-ons we will be installing.
Next, we will install each onto our Home Assistant server.
Now that the integrations are installed, we will configure Auto Backup. Go to Configuration -> Devices & Services -> Auto Backup

Configure Auto Backup to automatically delete expired backups and set a reasonable backup timeout, then click Submit.

Now, go to Settings -> Automations & Scenes. Create an Automation and use the Automatic Backups blueprint.

Now, you can configure how to name the backups, when to run them, whether to specify a password and what types of backups to run and store. When everything is configured as you’d like, save the automation and manually execute it to take your first backup.

Back in Devices & Services or by adding a card to your dashboard, you can view when there are pending backups. Since I’ve had this running for a bit already, you’ll notice my last backup was about three hours ago.

Remote Backups
Now that we have local backups running, it is time to configure rclone to sync them to an S3 bucket. In my case, I am using a Wasabi bucket.
Go to Settings -> Add-ons -> Rclone Backup. Under Configuration, you’ll specify synchronization jobs as well as a rclone config file path. For example if I want to once a day at 4:10 AM sync all backup files, it would look like the following:

Now, we need to configure the rclone config. I like to use the HACS Add-on Visual Studio Code to edit files like this, so I can do it from the web browser fairly easily. Because we are using rclone, we can sync backup files to any target rclone supports. You can visit the official Rclone docs to see the storage types supported and required config arguments for each. In this case, we are writing to a bucket in Wasabi’s us-west-1 region.

Now, we should be all clear to go back to the add-on and start the service. I also like to make sure Start on boot and Auto update are enabled.

If everything is configured properly, you should see successful file clones in the Logs.

Immutable Copy Using Veeam
Now that we have a copy of our Home Assistant config that Veeam can access, we are going to launch the Veeam Backup & Replication console to configure an S3 bucket backup. Under Inventory, go to Unstructured Data -> Add Data Source.

Select Object storage.

Choose the correct type. In my case, it is S3 Compatible.

Specify a friendly name, service point, access credentials, and region.

Next, set the proxies to use, a repository for cache, and set how aggressively you’d like the bucket to be accessed by Veeam.

Apply the settings and select Finish to close out of the wizard.

Now, back under Home -> Jobs, I have an option to create an object storage backup job.

Some of this is familiar. I name the job and add objects to be processed, as well as set exclusions.


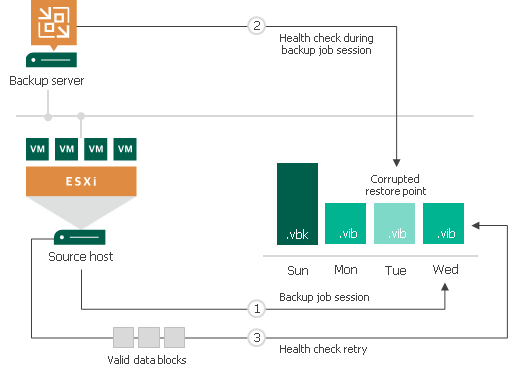
Next, specify a repository and retention settings. Here you can also set encryption passwords and health checks under Advanced. In this case a SOBR is targeted with a Windows ReFS performance tier on-premises and an immutable Wasabi capacity tier located in us-central-1 for geo-redundant, offsite, immutable backups.

Now, an Archive repository can be specified for long-term retention and another copy.

Finally, set a job schedule and click Apply -> Finish to save the job.

You can now manually start the job to ensure it successfully copies data.

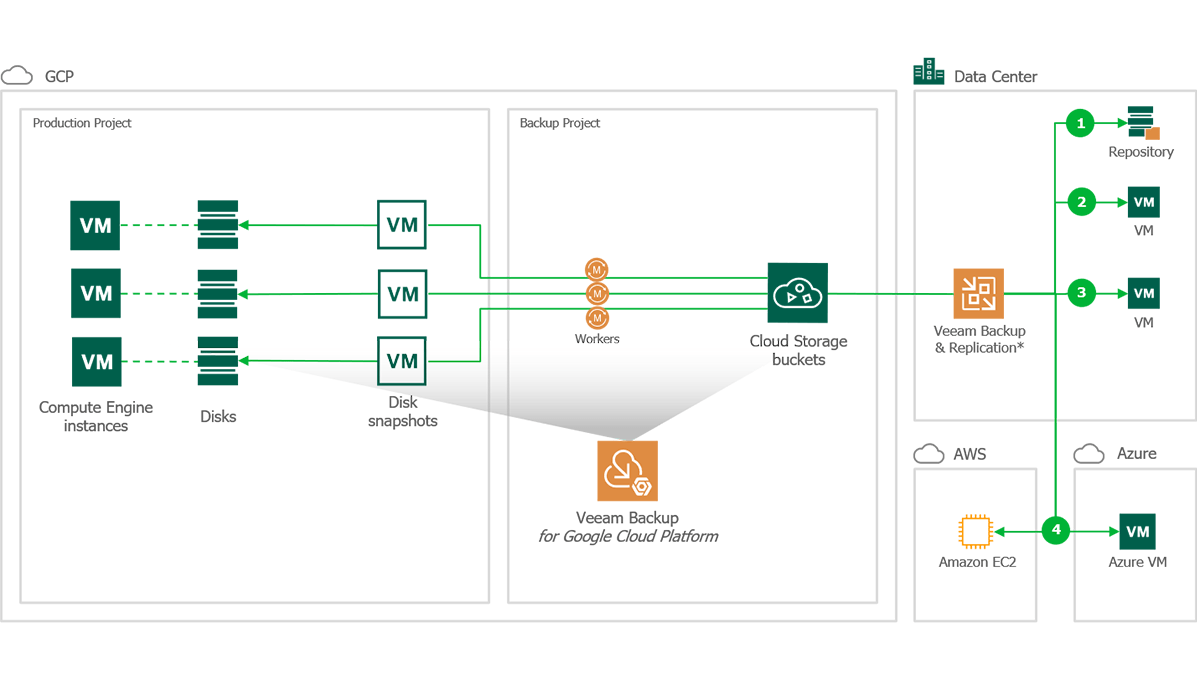
We now have 3-2-1-1-0 backups (and then some) for our Home Assistant configuration, ensuring that if we ever need to rebuild or restore the config, we have multiple, redundant copies in multiple locations, at least one of which is immutable!